Entry · Ref XOV0ZCLD
When and How to Replace a Radon Fan for Your Home Mitigation System
- Posted
- 2026-11-10
- Last amended
- 2026-11-10
- Account
- @radonfanreplacementinfo
Why a Radon Fan Matters for Your Home
A radon mitigation system works by drawing soil gas from beneath your home and venting it safely above the roofline. The component that does the pulling is the radon fan. It runs continuously, year after year, exposed to temperature swings, humidity, and the occasional power surge. Over time, every fan will wear out. Knowing when to plan a radon fan replacement can save you from losing system pressure and letting radon levels creep back up.
Signs Your Fan May Need Attention
Fans rarely stop working without warning. The most common clue is a change in sound. A new fan runs with a steady, low hum. If you start hearing rattling, grinding, or a pitch that rises and falls, the fan motor bearings may be failing. Another sign is a drop in system vacuum. Many mitigation pipes include a manometer, a small U-tube gauge that shows pressure. If the liquid level stays the same but your fan has been running for years, the impeller may be worn or the motor may be losing torque.
Some fans fail silently. They spin but no longer move enough air. In those cases, the only way to catch the problem is to test your indoor radon level periodically. If a test shows a level above 4 pCi/L and your system was installed to keep it below that, the fan is a prime suspect. A visual check of the fan housing and wiring can also reveal cracks, corrosion, or signs of overheating.
How a Radon Fan Works Inside the System
To understand what goes into a radon fan replacement, it helps to know how the fan ties into the rest of the system. The fan sits somewhere along the vent pipe, often in an attic, garage, or outside the home. It creates negative pressure in the suction pipe that pulls gas from the soil. The fan discharges into a vertical pipe that carries the gas above the roof. The fan motor is typically a sealed unit designed for continuous duty. The fan housing protects the impeller and directs airflow. Wiring connects the fan to a power source, often with a dedicated outlet and sometimes a warning alarm. The whole assembly is mounted securely to prevent vibration from loosening joints over time.
Planning a Fan Replacement
Replacing a radon fan is not a simple swap like changing a light bulb. Each fan has a specific size, shape, and connection method. The first step is to identify the make and model of the existing fan. Most manufacturers print model numbers on a label attached to the fan housing. That number tells you the fan size, electrical requirements, and the type of duct connections it uses. Without that information, you risk buying a fan that does not fit the pipe or does not move enough air for your system.
Once you have the model, you can look for a direct replacement or a compatible unit from another brand. Some fans use standard 4-inch or 6-inch round duct connections. Others have proprietary flanges. Buy a fan that matches your pipe diameter and your system's airflow needs. A fan that is too small will not create enough vacuum. A fan that is too large may cause the system to overspeed, wearing out faster or creating excessive noise.
Tools and Preparation
Before you touch anything, turn off power to the fan at the breaker. Radon fans are usually wired to a dedicated circuit, but some share a switch with other equipment. Confirm that power is off with a non-contact voltage tester. Gather basic tools: a screwdriver set, wire cutters and strippers, electrical tape, a drill with bits, and possibly a utility knife. If the old fan is glued to the pipe with PVC cement, you will need a saw or a coupling to remove it. Many newer fans use rubber couplings and hose clamps, which are much easier to take apart.
Check the fan mounting location. Fans installed outdoors need to be weather-rated. Fans in attics should be accessible and not buried under insulation. If the old fan is hard to reach, you may need to move the new one to a better spot, which means extending or shortening the pipe. That adds time but can improve system performance and future maintenance access.
Step-by-Step Removal
Start by disconnecting the wiring. Take a photo of the connections before you remove them. Label the wires if they are not color-coded. Most fans use a standard black-and-white wire for the motor and a green ground wire. After the wiring is free, remove the pipe connections. If the fan is clamped with rubber boots, loosen the clamps and slide the boots away. If the fan is cemented in, cut the pipe a few inches above and below the fan. You will need a coupling to splice the new fan into the remaining pipe.
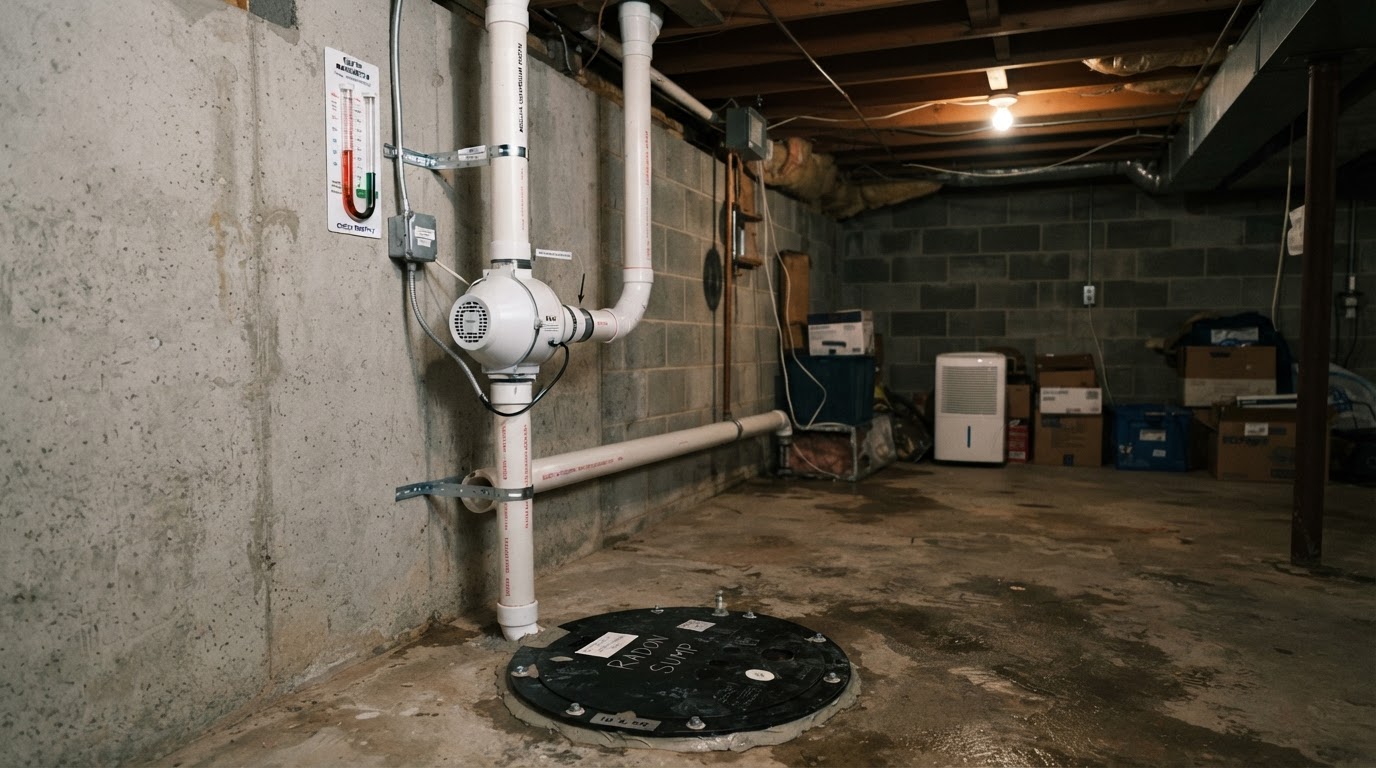
Remove the fan from its mounting bracket or platform. Some fans are held by a single bracket; others sit on a shelf. Lift the fan out and set it aside. Clean the pipe ends. If there is old sealant or glue, scrape it off so the new connections seal well.
Installing the New Fan
Mount the new fan in the same orientation as the old one. Most fans have a marked airflow direction. Make sure the arrow on the fan housing points from the suction pipe toward the discharge pipe. Secure the fan to the mounting surface with screws or brackets. Do not let the pipe support the fan's weight; that can strain the joints and cause leaks.
Connect the pipe. For rubber couplings, slide the coupling onto each pipe end, insert the fan's inlet and outlet into the couplings, and tighten the clamps. For cemented connections, apply PVC primer and cement to the pipe ends and the fan's sockets, then push them together and hold for a few seconds. Let the cement cure for the time recommended on the can before running the fan.
Reconnect the wiring. Use the photo you took earlier as a guide. Splice the wires with wire nuts, and wrap each connection with electrical tape. Tuck the wires neatly so they do not touch moving parts or get pinched. Turn the power back on and listen. The new fan should run smoothly and quietly. Check the manometer to confirm the system is pulling the right vacuum. If the gauge does not move, there may be a leak in the pipe or the fan may be wired backward. Some fans can run in reverse if the wires are crossed, so double-check the motor wiring.
Long-Term Care After Replacement
A new fan gives you a fresh start, but it still needs occasional attention. Check the manometer monthly. If the level changes, something may be blocking the pipe or the fan may be failing. Listen for new noises. Keep the fan area clear of debris and insulation. If the fan is outdoors, make sure the housing stays sealed against rain. A fan that gets wet inside can short out or rust.
Some homeowners schedule a radon fan replacement every five to seven years as preventive maintenance, even if the old fan still runs. That can avoid the hassle of an unexpected failure. Others wait until a test shows high radon levels. The best approach depends on the age of the system, the local climate, and how hard the fan has been working.
Common Mistakes to Avoid
- Using a fan that is not rated for continuous duty. Some general-purpose fans overheat quickly under constant load. Always use a fan designed specifically for radon mitigation.
- Forgetting to seal pipe joints. A small leak between the fan and the suction pipe can reduce vacuum enough to let radon levels rise.
- Mounting the fan in the wrong orientation. Installing it vertically when it is meant to be horizontal can cause premature bearing wear. Check the manufacturer's instructions.
- Leaving old wiring that is frayed or undersized. If the original wiring looks damaged, replace it with new wire of the same or larger gauge.
- Rushing the cement drying time. PVC cement needs time to cure before the fan vibrates and puts stress on the joint. Wait at least the minimum time listed on the label.
The Bigger Picture
A radon mitigation system is a set of parts that work together: the suction pit, the pipe, the fan, and the vent. The fan is the only moving part, so it is the first to need attention. Planning for a radon fan replacement is part of owning a home with a mitigation system. It is not complicated, but it requires careful matching of parts and good installation habits. If you are unsure about any step, a certified radon contractor can handle the job. The goal is to keep the system working reliably so your indoor radon level stays low.